Thursday, May 18, 2017

Backyard MAKEOVER Pt. 2

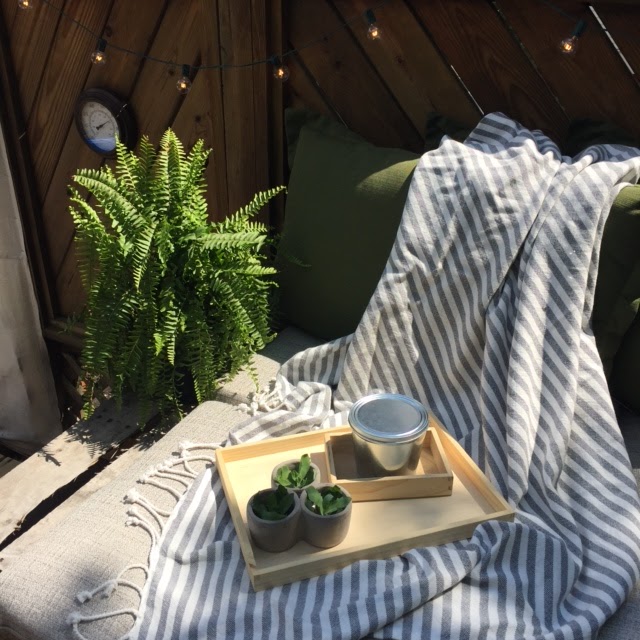
This is now my happiest place. Picture a margarita in my hand and the twinkling lights and now you 'get it.'
Where did we leave off yesterday? Oh right...you're dying to know how in the world I managed to spend $500 on such a small, seemingly 'acceptable' space. I tell you what...it's easier than you might think.

I wanted to note too...I REALLY think about something before I buy it. Especially BIG somethings. This storage bench has been on my radar and 'wish' list for over a year and Josh FINALLY saw the need and agreed we needed to drop a hundred bucks on it. Sometimes that's what it takes, but I'm super happy I took the time to think it through, plan where it would go, and be fully confident THIS would be the perfect solution to our outdoor storage needs. It doubles as seating which is a HUGE bonus after getting rid of the table and chairs we had on our deck for the past seven years. So it's usually a good idea to think through those bigger ticket items, but eventually it might mean spending $100, causing the project budget total to bounce up a little bit.

Living here has always been a 'temporary' idea...though we've never been sure of a timeline. In an effort to be content in the meantime, but also be wise about what we do to this house and what we should/shouldn't spend money on...I like to make smart, inherently useful purchases that can come WITH us when/if we ever decide to move. This bench is one of those things (this is also why FINALLY purchasing and installing new fans in our kitchen and living room took us seven years to accomplish ;).


Cost Breakdown
  • Pallets: Free (thanks BLC!)
  • Threshold Hunter Green Outdoor Pillows (6): Purchased on sale at $8/each four years ago (originally $30!)
  • Rust-O-Leum Grill Cover: $30 (from Lowe's)
  • Decorative Trays: Free (Melissa and Doug toy 'boxes'...unused in the house, serve a great purpose out here!)
  • Cutter Bug Candle: $6 (from Target)
  • RE Brand Outdoor Lights: $12.99/each (from Target, we used four strands and try to buy replacement bulbs + fuses to keep them going more than one year)
  • Plastic Storage Bench: $100 (from Sam's Club)
  • Threshold Black and White Outdoor Rug: $16.99 (Target sale)
  • Gray Linen Outdoor Bench Sofa Cushions: $95 total (purchased from At Home during a buy one, get one half off sale)
  • Threshold Striped Outdoor Blanket: $15
  • Miscellaneous Décor: Free! (borrowed from the 'unused pile' inside the house)
  • Olympic 3-Year Deck Seal: $35 (took three cans, and I purchased this last year to this is an estimate)
  • Oil Base Stain Brushes: $10 (estimate, purchased last year)
  • Duck Cloth/Drop Cloth Fabric: $10 (from Lowe's)
  • Staples: $5 (Ace Hardware)
  • White Wicker End Table: Purchased at a garage sale last year, $10?
  • Barn Door: 'Free' from our 1880 barn
  • Screen Door: Free from a curb
  • Hostas in Landscaping: Free (splitting from someone who has too many big ones is a great idea!)


I won't go into what I spent on pots and plants this year...that's probably a separate blog post...something about 'Gardening for BEGINNERS' but let me just say...watering my cute little plants with Maverick's pool water *might* be my new favorite thing. I don't love the planting part, and I refuse to have a garden that requires ANY time spent 'weeding' but I do love what they look like when they're growing/blooming. Just GIVE ME ALL THE SUCCULENTS.

I'm also not including the cost of Mav's outdoor toys in this little analysis...from the pool to the water table to the slide I plan to purchase any day...I'm leaving all that out. Just know, 1/3 came from hand-me-downs/garage sales, 1/3 came to us as either birthday or Christmas gifts, and 1/3 I purchased after observing and researching and deciding what would be a good toy for this age/space, etc.

After spending five minutes in the backyard with Maverick AFTER this little makeover, it was clear the time and money spent on this project was necessary and GOOD. It took some convincing for Josh to understand why we were getting rid of the table and chairs (he's a creature of habit, that one) but I think he secretly loves cuddling outside on our couch at the end of a long day. And I loooooove spending naptimes out there reading, folding laundry, listening to podcasts and of course...getting some sun. I've said it before and I'll say it again...we need our house to work hard for us with everything we have happening here...from the business to Maverick to my hobbies to entertaining and hospitality...and I think I finally accomplished that for our backyard space.

So not the cheapest renovation in the world  (certainly not the most expensive, either!)...semi-unexpected...but we're really happy with it and excited to spend our summer out here with each other, and our wonderful friends and family. :)

Tomorrow I'll share some crazy before and after pics. These posts got too long to truly show the renovation in all its ugly before and beautiful after glory. So brace yourself for those.

MmB

Wednesday, May 17, 2017

Backyard MAKEOVER Pt. 1


I've posted about this project on Instagram a little bit over the past month and I am so excited to share it with you. For less than $500 (that seems like a lot but keep in mind it's STILL cheaper than buying a new house, amiright?) we've transformed this awkward space into one of the best things about our property. I'll break down my goals for the 'design'; my thought process behind why I did certain things; and also give you a little cost analysis...if for nothing else, so my husband will know what I bang-up job I did finding deals, re-imagining and re-using stuff, and making our money stretch. :)

I'll start off by disclosing...when I say 'backyard'...what I really mean is we have zero YARD space in our BACKYARD. It's completely covered in river rock, has a small square of cement where our hot tub sits, and has an awkward-ly shaped deck area...for reasons I won't totally get into in this blog post, Josh did some minimal construction a couple years ago tearing off a section of our deck and revamping it to prepare to put our hot tub in the area beside our garage and our neighbor was a real big jerk about it...involving lawyers and threatening to sue us (let me reiterate...we were putting OUR hot tub, on OUR property, next to OUR garage...it was all completely absurd) so we dropped the whole idea...put the hot tub on the square cement pad in the middle of our backyard, and called it a day. Leaving the deck in a state of unfinished disarray...causing us a lot of frustration and irritation, unsure of how to move forward with the space.

That was nearly three years ago...to say I'm annoyed with us for wasting three years of our life being discontent and irritated about the state of our backyard is an understatement. But we just honestly didn't know what to do with it. And when we would talk about what we should do with it, we generally disagreed about what we should spend money on to get it to a place where we liked it again...because it technically 'looked' ok...and it technically 'worked' ok the way we used it back then...pre-mobile toddler. So we left it because that was easier than troubleshooting and arguing and spending money when we weren't sure the direction we needed to go.

Flash forward three years...complete panic this spring when I realized our backyard absolutley was NOT going to work for us this summer. I took to calling it a baby death trap. After spending five minutes with Maverick back there, I was able to zero-in on a couple of things that would cause major issues for us if I didn't figure out a good way to fix them. These were my goals for this unexpected project.

For years I've had Josh storing these pallets outside so they could get all gray and weathered...never really knowing what I would use them for some day...TADAAA!

1. SAFETY

The part of the deck I mentioned Josh tore off...yea...I'm talking, there was a 3+ foot drop-off to the gravel ground. Not ideal. We also have exposed steps at the side of our house to walk out to the garage/driveway/13th St...that was NOT going to work. I quickly realized I couldn't come in the house to grab my phone/water/snack/sunglasses/go to the bathroom for even two minutes without fearing for Maverick's safety. I try to be a chill mom most of the time, but this was not going to work long-term, for sure...even with the most diligent discipline and training.

We started by moving the grill to 'block' off the stair opening...easy enough, right? It's taken some getting used to (on our part), but after adding the grill cover (so Mav couldn't get to the buttons and all the nasty charred stuff underneath) that problem was basically solved. I didn't want some sort of permanent 'gate' because it would take longer, cost more, be PERMANENT, and we needed something now. Moving the grill to deter Mav seemed like the best solution. And it's worked like a charm.

The diagonal drop-off was a little harder...I talked with Josh about what we could do to turn that into another 'level' of our deck without doing any permanent, permit-required, deck-building to tick off the neighbor. We decided to stack pallets in that area three-high and now it's way safer AND so much easier to utilize. I plan to cover the pallets (where Mav's little pool sits) with a big, cheap, outdoor rug since he loves climbing in and out...and I don't want any splinters getting in those sweet little feet of his.

I've taken to cutting random sprigs of things from all around our property and poking them in this little cement pot. It's free and it looks cute for a couple days a time. And it's surprising, but that bug candle has worked wonders for us this spring.

2. FUNCTION

We have people here a lot, but we rarely haul everything out to the deck to eat a full meal. Until a few weeks ago we had a large table and six chairs taking up 85% of the surface-area of our deck, but that no longer made as much sense as it did seven years ago. It just wasn't great for a toddler who wants some room to run around and play with his toys (especially when he doesn't have yard space anywhere else for playing).

The first thing I did was find a new/temporary home for that outdoor set to reside until we have room for it again (thanks, mom and dad!). I had dreams of a pallet 'sectional' but simplified that vision a little...we didn't do anything except stack pallets three high, added cushions on top and now we have an outdoor 'couch.' The fencing at the back of our deck acts as the 'back' for me to prop the pillows against, which meant the pallet couch didn't require any amount of 'building.' Just required some transporting from the acreage to our house and then unloading to our backyard (thanks, Josh!).

Those lights are the best thing about this space. It looks downright magical at night.

3. LOW-MAINTENANCE

I wanted Mav to be able to have useful, age appropriate, attention-grabbing toys...and I needed to choose them wisely based on the size of the space. I wanted to keep furniture and 'stuff' minimal so I could easily sweep, pick-up, and entertain.

I got a little caught up with all end tables and decorative accessories on the shelves at Target, but realized I didn't want that much 'stuff' to have to work around. ROOM TO PLAY is what we needed. Right now it's pouring outside and all I had to do was empty Maverick's water table and pool, put them against the house and we're good-to-go (they get super scummy when they're left out and end up making more work for me in the long-run). I'm baby-ing my cushions and pillows until I get them all covered with outdoor, Scotch-Guarded fabric (they're all made of outdoor fabric, but they last sooooo much longer with covers!), so I did move them inside for tonight. Overall...super easy to sweep, keep everything clean, picked up, and organized.

 I found these metal boxes in the shed...apparently they're something Josh uses to store irrigation parts...but these ones were empty and he has 20...so now I use them for height (see below) and to store sunscreen, bugspray, lighters, and extra bubbles. My dad's 'antique' tractor is my favorite part about this picture. ;)

4. PRACTICAL

It's been so easy for me to focus on the stuff I don't like about our backyard area; idealize what other people have for outdoor space; and wish for ways our situation was different. How annoying. After letting all of that go, I was able to get to work with practical ways to make this area work better for our family, which is always the #1 goal. I don't think I've ever been more content with the state of our home and I think that has as much to do with my attitude as it does the hard work I put into re-creating this space, making it function better.

This project needed to be done FAST. It also needed to require zero time/energy/attention from Josh. I can't take things like this on, dig myself a giant hole, and then ask him to finish/fix it. That is never an option....always an important thing for me to remember ;) The footprint of the deck and the general situation of our backyard isn't going to be changing anytime soon so I had to keep that in mind while brainstorming and designing. A lot of times we have people over and they offer friendly, overly-ambitious solutions like..."you should get rid of the rock and plant grass!"...or "tear down the fencing and open part of the yard up!"...yaaaa exactly none of that stuff is going to happen (though Josh DID cut down a tree back here last week, AND gave the rest of our trees a haircut and I'm thrilled about it! I'm already making plans for a rock path to a sandbox and/or playhouse!). So I needed to be realistic and incredibly practical when it came time to re-invent this space without doing anything too drastic.

What started out as an area with NO pots and plants...is where I now have six. Oops.

5. PRETTY

I started by stripping everything away to start with a blank slate. This helped me TREMENDOUSLY with imagining and envisioning what we wanted/needed for our 'new' space. I took EVERYTHING off the deck, power washed the wood decking, bench, and fencing...then spent two days sealing the deck with three cans of Olympic, 3-year-guarantee, natural-colored, oil-based sealant.

Without spending much on the pretty factor...after putting a lot of thought into each individual purchase/decision, I feel like I accomplished that 'pretty' part well. I mixed a little pattern with terra cotta, hunter green, gray pots and cushions, galvanized metal, and weathered wood, and I plan to throw pattern in with a couple accent pillows on the toy storage bench and the pallet couch. The plants I bought really lend themselves to being all the 'decorating' I need...I keep finding spots where I would like to add a couple more here and there, but I need to STOP (FERNS ARE MY EVERYTHING).

Take special note of the oatmeal colored drop cloth stapled to the lattice near Mav's pool/pallet area. That took a LOT of thought, and it might be the thing I'm most proud of. It. Was. Ugly. The lattice/decking piece that's propped there was just something Josh threw up and it's completely crooked. Seriously awful. So instead of complaining about it or even asking him to fix/change it (it has been this way for almost a year), I bought a $10 drop cloth from Lowe's and casually asked Josh where his staple gun was...then went to town. He's certain it won't last long-term, but if it lasts through this summer/fall season, I'm happy with it!

Tomorrow I'll tell you how and where I spent that $500 to totally revamp this backyard space.

MmB

A few more pictures of the process and of Maverick enjoying the fruits of our labor... :)

Re-routing a gutter that was adding some ugly to the backyard situation...totally his idea! But I was weirdly excited it was finally getting done. ;)

I've found Olympic brand paints and stains to be just as good as anything else on the shelf at Lowe's...despite it's significantly lower price point. In case anyone cared.

At 10pm, when I realized I would need another gallon of stain to finish the final 1/4 of the deck. 
This adorable little rug was my reward for finishing the hardwork of power washing and stain/sealing. I've kind of been psyching myself up to do this project for the past eight months, so I needed something to get me to the finish line.
The door from our barn... #swoon
This sweet little buddy is so happy and content to play back here now.
Keeping my ferns on the ground this year instead of hanging them from hooks has helped a TON in keeping the birds from building nests inside and killing them. Nothing makes me madder than spending $12 on something that ends up dying in a week, despite my honest and diligent efforts to keep it alive.
Here's a better shot of that terribly awkward area I've been referencing. Picture those chairs painted a dark gray and my zinnias blooming and you will get my complete vision.

Those cute little scapulas just get me every single time. I love how happy he is about this $10 plastic pool.
There's one of those chairs and end tables (they came with the house) painted cream...that project didn't go as smoothly as my spray painting endeavors typically do, so I don't want to talk about it much. I also added hostas to that landscaped area over the weekend (again, thanks mom and dad!).
Keep your eyes open at Sam's Club for good deals on outdoor stuff. These rugs are a fraction of the price at Sam's Club as compared to Target. And they're a size bigger. I bought this one last year, but they do have similar rugs out this year.
These four little cuties were the motivation behind the new design and color scheme of our backyard. I love their natural summer colors and how classic terracotta, greenery, and chalkboard stands out against a woodgrain backdrop. A modern twist on everything I love about summer, I just didn't realize it until a month ago.

Monday, May 8, 2017

Maverick: 20 Month Update

18-month pictures by LePhotoDesign
I refuse to be one of those mom's that uses month's to answer how old her kid's are until they're 12...but for the sake of these updates...I'm going to do the month-thing until Mav hits 2. After that they will either be half-birthday updates or yearly updates. Goodness he is changing so much. In four months we will have a two-year-old!

A few big things come to mind when I think of Maverick these days. 1. He's a toddler. Our baby is gone and we have a full-blown toddler kiddo on our hands. Which is more fun in some ways, more frustrating in many ways, and challenging in different ways. 2. His last four teeth are coming in right now. He goes from being an absolute delight to being a terror in under 60 seconds. It's ridiculous and fascinating and funny all at the same time. 3. He's so smart. Observing the way he plays with his tractors to the particular way he stacks his Legos...I just love watching him figure things out and learn.

The past few weeks have been all about being outside. From the minute Mav wakes up in the morning he starts bringing me his shoes 'asking' to go outside to play. He's frustrated that he can always see his outdoor toys and his pool but he can't PLAY with them when it's cold and rainy out. Combined with the fact that until a week ago our backyard was basically a baby death trap...we weren't outside as much as Mav preferred. NOW that the deck is washed and sealed and we've done some rearranging...he loves spending time out there and his hair is getting blonder by the day. We've kicked into summer mode over here for sure!

He knows what puppies and cows say and it's downright adorable. He gives fives to anyone who asks and will also 'pound it.' He blows kisses, gives kisses to his favorite people, and will also give hugs (if he's in the right toddler-mood when asked). He waves bye-bye when people leave our house, when we're out and about, or when he's 'telling' me he's ready to go...he will just start waving and 'saying' bye-bye to the person I'm in the middle of talking to. He's getting really fast and when we're in the driveway I have to keep a constant eye on him while we work through training and disciplining him on outside no-no's...which are all new to him this year. Last summer at this time he wasn't mobile! He walks on his tippy toes sometimes which is funny and also kind of weird. Still loves being scared, eating raspberries off of his fingers, and playing with his tractor collection from sunup to sundown.

Look at this beautiful naughty teeth...do you have any idea how much work those teeth are?!
Some things this 20-month old can do that his mama is thrilled about:

1. He's starting to get better at walking on his own while holding my hand for short and direct distances (the church parking lot is still a challenge).
2. He can eat a sandwich in the car, on the go, in the stroller, or at a picnic like a pro. FINALLY.
3. He plays in the bathtub for up to 30 minutes, and because we spent the past 20 months watching him like a hawk and training him to keep his bottom glued to the tub...he's so good at it! I've started to feel comfortable popping in and out of the bathroom checking on him but also picking up the house a little during those 30 minutes before bedtime. I didn't realize how exciting that would be.

Despite some early-wakings the past month, he's been solid in the sleep department. I've noticed he chatters in there a little later some nights and occasionally I hear him happy-talking to himself in the middle of the night...but nothing major. I should disclose that last night was kind of awful...those last four teeth are coming in, I just know it...so he was up twice but went back to sleep with some medicine and cuddles.

Our schedule right now is this:
7/8:00 - Wake up
9:00 - Breakfast
10:30 - Small snack
12:00 - Lunch
1:00 - Nap
3/4:00 - Wake up
4:00 - Snack
6:00 - Supper
7:30 - Bedtime routine
8:00 - Bedtime

It's beautiful. I'm convinced THIS is the best season and schedule for littles. I'm in the sweet spot and I know it...so I intend to never waste it!

Mav still gets a bottle before his big nap and before bedtime stories and cuddles and I don't want to hear about it. I hate it. I've decided once all four of these last teeth are in we're dropping it and with the next kiddo I'm not going to be as much of a pushover about it. One year...DONE. I've now turned it into a 'thing' but I've never heard of a kid dying from having a bottle for too long so whatever. Instead of having to drop a paci (which Mav dropped himself at 4-months) we will struggle to drop the bottle but that's Future-Mollie's problem.

Maverick is in 18 and 24 month clothing for both tops and bottoms which is nice. He's always been right on schedule with clothes that match his age and it makes things easy for me now that I have that figured out. He's in size four diapers, and I'm going to switch him to 5's at night after my next Target trip. He's still in his crib and I'm planning that he'll stay there until at least his 2nd birthday but probably longer based on some of my friends' recommendations. We're not planning to touch potty-training with a 10-foot pole until his second birthday and I probably won't even get his little gray potty out until then (despite the recommendation of our doctor at his 18-month visit).

There are just some things I'm not interested in forcing until he seems ready for them, and those big-ticket items seem to be the things many parents get frustrated about. I am just approaching them with zero expectations and refusing to let them be a battle. I will be the chillest of the chill when it's time. Which is why I've started preparing now. ;)


Mav loves his little blue pool just as much as he did last summer. He likes going back and forth between that and his water table. He has a weird love of couches. He gets the biggest kick out of climbing up, scooching back as far as his booty will go and then tucking his arms behind him. He likes counting, can put his farm puzzle together perfectly, and is obsessed with Elmo and Sesame Street...which is mom's go-to on rainy days or when invoicing didn't quite get done during naptime. He's starting to be interested in playing with other kids and I observed him snatch a toy from an adorable little Asian girl at the library last week which was horrifying...so we have a few things to work on in that department. He will dance if he hears music and Jamie and I DIE when we catch him doing it all on his own.

Our buddy loves wrestling, being scared, being tickled, splashing us in his bath, hiding and waiting for us to come find him, 'driving' daddy's truck, 'helping' daddy work outside at the end of the day, and going for a ride on whatever machine Josh is moving around. Basically he's obsessed with his dad, but I can't blame him because so am I. He cries almost every time he leaves. Yesterday morning he happily spent 20 minutes on Josh's lap with his spoon, just happy to be working with daddy...and LOST HIS EVER-LOVING MIND when I took him away for a diaper change (it was time...he had pooped through to Josh's pants, but I loved how content he was on his lap!).

I would say Maverick is an annoying eater and I'm not sure what I could/should have done differently...some days he downs an entire banana and the next day he refuses it. Some days he scarfs his sandwich happily, some days he holds it toward me and cries. Yesterday while I was at Connection Group Jamie said he didn't eat any of his hamburger (which he LOVES) and she texted me, 'maybe he's tired of grilling?'...to which our collective response was TOO BAD. My mom and Josh are the pushovers in this department...they're always wanting to offer him more of his favorite thing or raid the fridge for anything else he can eat and I have to lay down the law like a real meanie. I've become quite fond of the phrase, 'you get what you get and you don't throw a fit'...and if he does throw a fit and refuses his plate at supper, he can sit there for 30 minutes with the rest of the table. Apparently this is cruel and unusual torture for grandmas and daddies.

We're still trucking in the discipline department and some days it feels like we're floundering to find our way. A few weeks ago there was a day where I felt like all I did was give Mav spanks, but most days he doesn't even get one. He now knows exactly what, 'You need to obey or you get spanks,' means. Aside from teeth (did I mention he's getting his last four?!) he's really well-behaved and happy and chill...with small flashing moments of toddler-hood thrown in. He gets ticked when his wagon comes unhooked from his tractor, when his cow doesn't stay on top of the tractor while he pushes it, and when he can't fit his two favorite Legos together. Other than that he's usually a dream.

Words! Haha the talking department is slow going. I'm not sure why...he clearly understands everything I say, but his main words are dadada, mom, wow, ohhhh, OOOOOO!, and he's started shaking his head and saying nononono which is...delightful. I'm not really bothered by this because he's so good at knowing the commands we work on all day (wash hands, let's go, time for nightnight, time to eat, let's pick-up, want to watch Sesame Street? etc.) the words will come. He likes 'helping' unload the dishwasher, unload groceries, pick-up toys, and just generally put things away. He's always handing me specks of dirt from the floor and making me laugh at how much he's like me in that way.

And one last thing, which might be one of my favorite Maverick-isms...when we're out shopping and he's in the cart, he knows his 'job' is to take and hold the receipt. He's gotten so good at it he now holds his hand out to 'ask' the cashier for the receipt and they look at me like, 'Is it ok that I give this to him?' and I go, 'Yep he knows it's his job,' and they hand it to him and he waves good-bye while we leave and it is just the cutest darn thing I think I've ever seen...especially with the jabbering thrown in the whole time...GAH! He is just so much fun and I LOVE that I get to spend every single day of my life with him!

MmB

Thursday, April 27, 2017

Painting Tutorial: Buffet

I had really good intentions of sharing this with you guys last fall right after I had it completed...but if I'm being honest, this project is still not 100% complete. I need to seal the stain on top with one more coat that I'm nervous about because I like how it looks right NOW and I don't want that final seal/top coat to change that. So I've put it off for seven months nbd.

Here's a picture of what our $200-Craigslist buffet (bought in 2012) looked like in our dining room BEFORE:

Not bad through an Instagram filter...but in the bright light of day it was ORANGE.

I knew this thing would be a beast to knock out...plus the far left cupboard is where we hide our Internet router and I was not looking forward to the cord mess I'd have to look at while I worked on it in the garage. But one day last September I worked up enough nerve to tackle it...and hauled it out to our deck through the back door by myself!

Then I spent the remainder of the afternoon sanding, until it looked like this:

And I sanded it WELL. I was not about to let this be one of the projects I was unsatisfied with in the end because I did a half-A job. The legs weren't easy, so I used a mixture of paper sanding and using the hand-sander we have.
Please also note...I hauled this buffet by myself from the deck, down three steps, through a skinny walkway, into our garage during naptime. I tell you what...having a husband work the hours he does has made me pretty self-sufficient in a few pretty handy ways. ;)

After sanding I wiped the buffet off with a damp towel cloth, then a dry towel to remove all the dust. Then I started right in spray painting. I like the Rust-O-Leum spray paint for its quality, but also for the spray-gun nozzle (you can see it in the picture below). It makes big projects WAY easier! The body and drawers/doors of the buffet only took two coats of spray paint, with a small third touch-up spray coat.

Because I had plans to stain the top a dark walnut color, I kept it covered with a sheet while I sprayed the bottom white. I did a little re-sanding to get the white spray-paint dust off before I started staining. I wanted to make sure the stain would soak into the wood well.

Our garage isn't the best work space, but it's important to keep spray paint 'dust' contained and out of the wind. And also in a well-ventilated place where the piece can dry. One of the reasons spray painting something this size isn't always the easiest option.
The next step was the part I was dreading. I'm no rookie to staining wood, especially staining wood that was an ugly, bright orange in its past life (ie: our kitchen cupboards). I believed I sanded the top as much as I could, so I was confident this part would go well.

It didn't.

It took about four or five coats of painting on the stain, letting it soak in for an hour or two, going out to wipe it off with a t-shirt rag, letting it cure/dry for 24+ hours, then going back in with another coat of stain to cover up the orange that was STILL showing through. This resulted in a finish that was waaaay too shiny for my liking.

See?? Too shiny. And this was before I sealed the stain with wax or poly or anything! I had both my mom's and all my sister's on a giant text message thread asking them their advice because I desperately did NOT want to mess this up!

My favorite part of any project...the distressing! I'm always AMAZED at how quality furniture painted well can look like I just went to Homemaker's and bought it! It's how I achieve the Magnolia furniture line 'look' without the price tag. ;)
I let the buffet fully dry and cure in our dining room for a couple weeks so I could sort of put everything back together while I decided on my plan of action. I've been known to jump the gun on this step and then kick myself later (you mean I can't decorate a freshly painted shelf RIGHT AWAY?!). I believed there were enough coats of stain soaked into the wood that I could do some light sanding to get the look I wanted and dull the shine. But I was a little nervous about it. I used FINE sand paper and made sure I sanded slowly and evenly.

Up close the orange shows through a little bit...and there is still a little too much shine for my liking...but overall I'm really happy with it.
If I were to do it again, I would have saved myself the extra two weeks and used a can of white, flat, spray paint on the top too. It's suuuuuuper durable and I love how it looks distressed. Of course I didn't know all of that going in...hindsight is 20/20, right? The front is what makes the statement, and I like that the buffet (and the cupboard we bought in Galena, and soon, my island!) mimics the theme of our dining room table...white below, walnut stained wood on top. Each piece is a little different and has ended up with a slightly different finish from each other, but they all tie together in a lovely random farmhouse way...and I love that.

Finished!
Here are a few shots of this refinished buffet beauty in action...and darnit if three weeks of annoying work wasn't worth the end result...

Mav's first birthday party...my motivation for getting this project to the finish line.
I keep felt 'feet' on the bottoms of everything that gets put on top to save the finish...I've become an old lady.
That galvanized feeder trough from our barn just has my whole heart. It doesn't matter what I do with it or where I put it, or that it's disgusting on the inside...I'm in love.
I hope my last two posts helped motivate you to take on that next painting project! Or maybe I scared you away from it...eeek, if that's what I did I'm sorry.

MmB

Wednesday, April 26, 2017

Talking Furniture

The buffet project that was supposed to take a day and took three weeks. More on that tomorrow.
It's come to my attention that people apparently trust my opinion when it comes to painting furniture. I am not sure why. Probably because I've painted so much crap and done it badly (our living room tables are on their 5th? 6th? coat of paint) and after that much trial and error, I've gained some degree of credibility. I've painted everything from curbside furniture to wood floors. My MO for the first few years we were married was dragging stuff home from curbs because "I can paint this and make it cute!" I've since given that up, (some stuff is just more work than it's worth) but I have the chevron-painted table to prove I probably know more than the teenager working in the paint department at Lowe's.

Here are my best tips...


Black paint can be your best friend. It can also be your worst enemy.

With all that crazy mismatched dumpster furniture, my (pretty brilliant) idea was to paint it black to create the illusion it matched. I wasn't too far off with this one, and would still encourage it if you find yourself in a post-college apartment on a tiny budget. Or wanting to freshen up a room by throwing in a sassy-black end table.

Pros? When stuff gets scratched, just throw on another coat of black paint. This worked for me for YEARS. Black will cover anything and everything in 1-2 coats.

Cons? Dust shows immediately after dusting. I'm talking, IMMEDIATELY. And black will make even the brightest rooms appear dark and heavy.

I still have a secret love for the eight-year-old, partial-gallon of black-high-gloss paint in our basement and might even pull it out again someday...

This dresser was a hand-me-down I was given in college and is losing it's laminate finish on one side...but if this coat of flat paint, new hardware, and a little distressing didn't bring it back to life...holy smokes.

FLAT PAINT IS THE BEST PAINT.

I stumbled upon this tip by sheer happenstance a year ago. I found a quart of $3 paint in the mis-tint section at Lowe's and bought it because...it was a can of $3 gray paint. The options are endless, people. What followed was a serious change in the way I paint furniture.

For years I was all about using 'high or semi-gloss' paints...something I believe I picked up from childhood about glossy kitchen walls being 'easier to wipe off'...which can be accurate. But who wants to be able to see their reflection in their yellow kitchen walls? I digress...I had taken to painting furniture with glossy paint (the easy to wipe rule applied, right?!) and found that no matter HOW MANY HOURS I let it dry in between coats or how low the humidity was, it was. always. sticky. Forever. Flat paint? Dries in like five minutes and is never sticky. Dresser drawers don't stick! Pictures frames on shelves don't stick! It's truly amazing! And the project turnaround time can't be beat.

I've used that quart of mis-tint paint for everything from painting the kick-plate under our kitchen cupboards, to the inside of my antique Galena cupboard, to the hand-me-down dresser in our bedroom. I will cry when it's gone.


Spray paint vs. brushed paint.

I like different things about both...these are my general rules:
  • If it will take less than four cans, it's usually easier to spray paint.
  • If it has turned legs, it's always easier to spray paint.
  • If there are any intricate details, spray paint.
  • Wherever the perfect color/finish exists, go that route.
  • If it's a huge/heavy furniture piece that isn't easy to haul out to the garage and back in by yourself because your husband won't help because he's busy and also thinks its stupid to paint a perfectly-fine piece of furniture another color when two years ago you wanted it to be the color it currently is...it might just be best to put some cardboard underneath and brush-paint it inside the house, right where it is.
I tend to brush paint simple, flat, shelves and dressers to avoid uneven-ness and dripping that spray paint can sometimes cause...but I spray painted a small-ish black bookshelf creamy white and it turned out really well. When I was finally ready to refinish our buffet, I chose a high-quality, flat, creamy-white spray for the bottom due to the intricate legs and door details and it worked wonderfully. I stained the top, but I'll explain that a little later....


A shot of our $10, previously yellow, turned black, turned white, garage sale end tables. It's truly amazing what paint and new hardware can do. These are chalk painted and while they look good from far away and through an Instagram filter...they haven't held up well.

Chalk paint is not worth the hype, in my humble opinion.

Maybe it's because I painted our living room furniture while I was eight months pregnant. Maybe it's because my first (and only up to this point) chalk painting project included tiny paint-brushing 12 turned legs. Or maybe it's because I was covering all of our BLACK furniture with WHITE chalk paint, resulting in no less than five coats when it was all said and done. Whatever the reason...I just don't love it. The whole process is more work than it's worth, and honestly, it hasn't even been two years and our living room tables are in desperate need of a heavy touch-up. It's kind of expensive if the project is big (I can't IMAGINE doing a dresser or cupboards) so I give it a C-, and that's being nice.


Painting with color is not always a good idea.

Oh guys. If you know me, you know I once had a red kitchen, a purple dining room, a lime green living room wall, a pink laundry room, and a turquoise bedroom ALL AT THE SAME TIME. WHYYYYYYYY didn't Jesus just take the wheel and stop me before I painted all 1,200 square feet of our house with that much color?!?!

I cannot even. Some days I want to punch 21-newlywed Mollie in the face, mainly for all the work she caused Future Mollie by painting the hallway closet 'Jalapeno Jelly' LIME GREEN.

This is what I am saying to you. Think about it for a looooooong time before you pick up that paint brush with red on the end because, "Everyone has a red kitchen! I want one too!" Collect samples, pin stuff to a fresh board on Pinterest, look at the latest Magnolia magazine, ask me for my opinion, then and ONLY THEN are you allowed to paint something an obnoxious color. I thought about my pink door for a full year before I actually did it. And I still love it! I'm about 80% sure I'm going to spray paint the base of my kitchen island vintage turquoise, but I need a little more time before I'm ready to commit. I learned all of this the hard way and made WAY more work for myself. Please, for the love, don't make the same mistakes I did.

On the flip side...don't be too scared of color either. Paint can always be changed and sometimes obsessing about it for a year isn't the best idea. A few years ago I woke up with nothing to do on a Saturday morning and decided I couldn't live with a red kitchen for another minute. By the end of the day I had a neutral, cool gray kitchen. It's the room that started the neutral transformation throughout the rest of our house! Quick decisions aren't always bad.


I'm a big fan of mixing paint and stain on a single piece of furniture. It breaks up the color and I always think stain holds up better on high-traffic surfaces than paint does. So I keep a little can of walnut-colored stain on hand to work on projects here and there.

Don't forget about wood stain!

I didn't discover the beauty of wood stain until a few years ago when we took on staining our cupboards...you can read about that insane project here. When we moved in I had dreams of painting our cupboards white (SO GLAD I took three years to think about it!), but realized stain is much more durable, thinner (three layers of paint adds some thickness to cupboards...which can make it hard to get them to lay and meet and hang like they did before painting them), and richer. People are always asking about our cupboards, which is such a shock to me because they're just ugly 50's cupboards with two cans of stain and fresh hardware (and also two weeks of hard work and one crying episode from yours truly).


I'll rapid-fire a few final thoughts:
  • Learning how to free-hand trim is one of the best and most useful life skills I've learned
  • Rollers are disposable, don't waste your time rinsing them out
  • Oil-base painting is sometimes a necessary evil...our plastic kitchen 'backsplash' has held up super well!
  • Satin poly can seal and save almost anything (ie: the farm door in our living room, metal ceiling plate hanging our wall)
  • If it's not oil-base, painting while pregnant in a well-ventilated space is really no big deal
  • Using sand paper to 'rough up' a painted furniture piece is the perfect way to get the farmhouse look but start off slow...less is usually more
  • Sometimes old furniture is amazing and worth every bit of the hard work...but sometimes, it's better to just go to IKEA for a new dresser
  • Stuff will almost always cost more and take longer than you think...be prepared for that
  • We still have one of our very first 'dumpster finds' living in our house but I'm going to make you guess what it is................. ;)
If you have questions about something I shared, just text me. Seriously...I love spending naptime texting friends about paint samples and furniture arrangements. 

MmB